
Soups & Stews
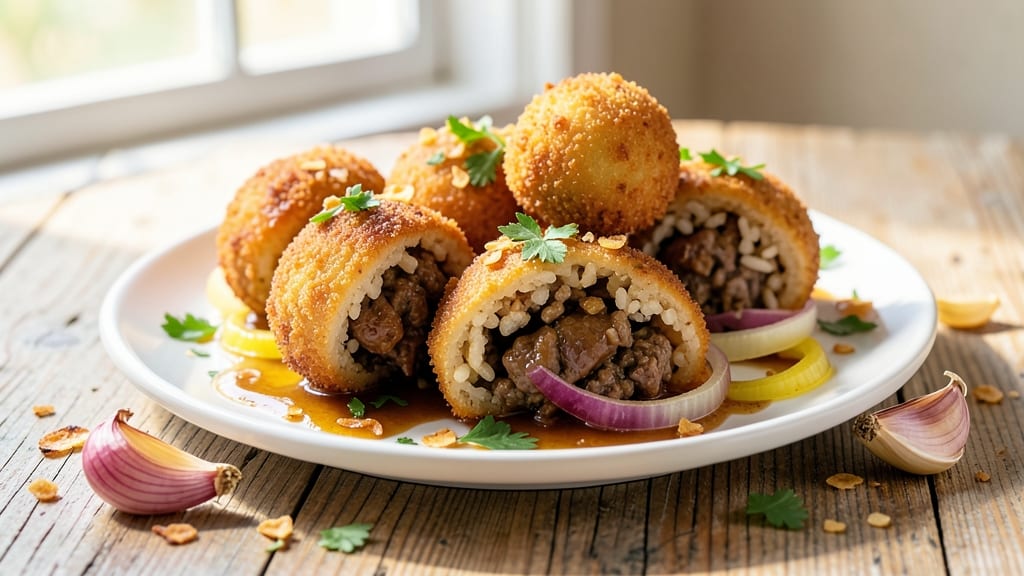
This beef arancini recipe delivers the perfect balance of crispy golden crust and creamy, melty cheese—just like your favorite Italian trattoria. The secret lies in a rich risotto base infused with tender ground beef, then carefully shaped and breaded for that signature crunch.
I've perfected this technique through years of testing, ensuring every bite delivers both texture and flavor without requiring advanced skills.
The process begins with cooking Arborio rice in a savory beef broth, building a creamy yet sturdy base that holds its shape when fried. What sets this recipe apart is the double breading technique—first with panko for structure, then with fine breadcrumbs for that delicate, golden crust.
The filling combines melted mozzarella and parmesan for that classic cheesy pull, while the beef adds hearty satisfaction.
By the time these arancini emerge from the fryer, you'll have perfectly golden spheres with crispy exteriors and gooey, cheesy centers that practically melt in your mouth.
The aroma alone will fill your kitchen with the scent of Italian comfort food, making them ideal for appetizers, game day, or a cozy weeknight dinner. Serve with marinara sauce for dipping or as part of a larger antipasto spread.
This recipe adapts beautifully to different beef preferences—whether you use finely ground chuck, a classic ragù, or even leftover pot roast. The shaping technique ensures they hold together during frying, and the double breading guarantees that crispy texture you crave. Let's create these restaurant-quality bites at home.
Ingredients for beef arancini
Pantry staples meet Italian comfort food for these crispy, cheesy risotto bites.
| Ingredient | Amount | Notes |
|---|---|---|
| Arborio Rice 🍚 | 1 cup | Uncooked, short-grain preferred |
| Ground Beef 🥩 | ½ lb | Finely ground chuck, 80/20 fat ratio |
| Yellow Onion 🧅 | 1 whole | Diced into small pieces |
| Garlic Cloves 🧄 | 4 cloves | Minced into fine pieces |
| Beef Broth 💧 | 4 cups | Homemade or quality low-sodium |
| Whole Milk 🥛 | ½ cup | Warmed for creamy risotto |
| Parmesan Cheese 🧀 | ½ cup | Freshly grated from block |
| Mozzarella Cheese 🧀 | 1 cup | Fresh mozzarella, shredded |
| Japanese Panko Breadcrumbs 🍞 | 1 ½ cups | For first breading layer |
| Fine Breadcrumbs 🍞 | ½ cup | For second breading layer |
| All-Purpose Flour 🌾 | ¼ cup | For dredging before breading |
| Large Eggs 🥚 | 2 whole | Beaten for egg wash |
| Vegetable Oil 🫒 | 3 cups | For frying, 350°F |
| Salt 🧂 | 1 ½ tsp | Kosher or sea salt |
| Black Pepper 🌶️ | ½ tsp | Freshly ground preferred |
The Arborio rice is non-negotiable here—it's the secret to that creamy yet sturdy risotto base. Lidi or Barilla are my go-tos, but any quality Arborio works. For the beef, 80/20 ground chuck gives you that perfect fat-to-lean ratio for flavor and tenderness. If you're feeling fancy, grab pre-minced garlic at Whole Foods—it saves time and keeps things consistent. The Parmesan and mozzarella should be freshly grated for that authentic pull. I always buy mozzarella in blocks and shred it myself; pre-shredded gets gummy when fried.
No Arborio rice? Carnaroli rice works too—it's what the pros use. Short on beef broth? Chicken broth with a splash of soy sauce gets you close, but beef is ideal. The panko should be Japanese-style for that light, crispy texture—Goya or Japanese markets have the best. For the breadcrumbs, if you can't find fine ones, pulse regular breadcrumbs in a food processor. The egg wash is key—beat the eggs until frothy for better adhesion. And if you're frying, keep the oil at 350°F—any hotter and they'll burn before cooking through.
Shape these arancini right after breading—they hold together best when fresh. Fry in batches so the oil doesn't cool down too much. They reheat beautifully—just pop them in the oven at 375°F for 5-7 minutes. Store any leftovers in a single layer on a wire rack to keep them crispy, then cover with a clean towel. Good for 2 days in the fridge, but honestly, they disappear fast. Freeze extras on a tray first, then transfer to a bag—they'll keep for 3 months and still taste amazing when reheated.
Why You'll Love This Recipe
- One-Pot Magic: I swear by this recipe because it’s actually one-pan friendly. Brown the beef and onions right in the same pot you’ll cook the rice—minimal chopping, no extra dishes, and that rich beef broth turns into a velvety sauce that clings to every grain. (Yes, even on a Tuesday night.)
- Umami Bomb: That ground beef and beef broth combo? It’s like a flavor grenade. The onions caramelize just enough to sweeten the bite, while the garlic cloves get toasted until they’re fragrant and deep—no need for fancy seasonings. Honestly, the taste alone makes me want to double the batch.
- Weeknight to Party: I’ve served these as casual finger food for game nights and as a showstopper for dinner guests. They’re easy to halve for leftovers or double for a crowd, and the crispy breading (if you add it) makes them feel way fancier than they are. Between us, my kids think they’re "special occasion" food.
- Budget-Friendly Powerhouse: Arborio rice and ground beef are pantry staples that stretch far. This recipe feeds four for under $10, and the leftovers reheat beautifully—just a splash of broth to keep them tender. I’ll be real: it’s my go-to when I’m broke but still want something that feels like a meal.
Step-by-step instructions for beef arancini
Let's make these golden, crispy risotto bites with melty cheese centers.
Cook the Perfect Risotto Filling
Heat 2 tablespoons vegetable oil in a large skillet over medium heat. Add the 0.5 lb ground beef and cook until browned, breaking it apart with a wooden spoon. Drain any excess fat, leaving about 1 tablespoon behind for flavor.
Add the 1 whole yellow onion and cook for 3-4 minutes until softened. Stir in the 4 cloves minced garlic and cook for 30 seconds until fragrant. Add the 1 cup arborio rice and toast for 1-2 minutes until translucent at the edges.
Begin adding the 4 cups beef broth 1 cup at a time, stirring constantly and waiting until each addition is mostly absorbed before adding the next. After about 12 minutes, stir in the 0.5 cup warmed whole milk, 0.5 cup parmesan cheese, 1.5 tsp salt, and 0.5 tsp black pepper. Remove from heat when the rice is al dente with a slight bite.
Mix in Cheese and Shape the Arancini
Spread the cooked risotto on a baking sheet and let it cool slightly. Once cool enough to handle, fold in the 1 cup shredded mozzarella cheese using your hands or a spatula. The mixture should be cool but still pliable - if too warm, chill for 10 minutes in the fridge.
Roll the mixture into 1.5-inch balls, packing them firmly but not too tightly. I use a 1.5-tablespoon scoop for consistency, then gently roll each ball between my palms. Place on a parchment-lined tray and refrigerate for 30 minutes to firm up.
Create the Crispy Breading Layers
Set up three shallow bowls: one with the 0.25 cup all-purpose flour, one with the 2 beaten large eggs, and one with the 1.5 cups japanese panko breadcrumbs. Roll each chilled arancini ball first in the flour, shaking off excess, then dip into the egg wash, and finally coat thoroughly in the panko.
Place the breaded arancini on a wire rack set over a baking sheet. This prevents them from steaming and keeps them crispy. For extra crunch, I press down gently on each ball to ensure the breadcrumbs adhere well. Let them rest for 10 minutes before frying.
Fry to Golden Perfection
Heat 3 cups vegetable oil in a deep skillet or Dutch oven to 350°F. Fry 4-5 arancini at a time, turning occasionally, until deep golden brown on all sides, about 3-4 minutes total. They're ready when they float to the surface and maintain their shape.
Transfer to a paper towel-lined plate to drain excess oil. Serve immediately while still crispy. For the best results, keep them warm in a 200°F oven while frying the remaining batches. The secret to perfect arancini is frying in batches - overcrowding the pan will lower the oil temperature and make them greasy instead of crispy.
Pro Tips For Making Beef Arancini
- Cook the Beef First: Brown that ground beef until it’s actually brown—not just pink. I used to rush this, and the flavor ended up flat. Take the 3-4 minutes it needs to develop a deep color and caramelized edges before stirring in onions and garlic.
- Rinse the Rice: Give your Arborio rice a quick cold-water rinse before cooking. It removes excess starch, so the grains stay separate and don’t turn into gluey gunk when you shape the arancini later. Trust me, no one wants a mushy rice ball.
- Undercook the Rice Slightly: Pull the rice off the heat when it’s just al dente—about 2 minutes before it’s fully tender. It’ll finish cooking in the oven or frying, and the texture stays firm enough to hold shape. Overcooked rice = sad, soggy arancini.
- Use Cold Broth for Rolling: Chill your beef broth before using it to roll the rice balls. Cold broth binds better and keeps the filling from leaking out when frying. I learned this after watching my first batch fall apart mid-fry—messy, but effective.
Creative variations of this dish
Classic Ragù Stuffing
Swap the ground beef for a rich ragù made with slow-cooked beef, tomatoes, and herbs. Use 1.5 cups cooked ragù mixed with the risotto after it cools—this adds depth and a meaty texture.
I like using San Marzano tomatoes and simmering the ragù for 2-3 hours to develop the flavors. The acidity from the tomatoes also helps balance the richness of the cheese. 🍅
Spicy Calabrian Twist
Add a kick by mixing 2 tbsp Calabrian chili paste into the risotto filling before shaping. For extra heat, fold in ¼ cup diced spicy salami along with the mozzarella. Serve with a side of chili oil drizzle or a cooling basil yogurt dip to balance the spice.
This variation is inspired by Sicilian street food stalls where bold flavors take center stage.
Vegetarian Option
Replace the beef with 1 cup finely chopped mushrooms and ½ cup lentils (cooked). Sauté the mushrooms with the onions and garlic, then proceed with the risotto as directed.
Add 1 tsp smoked paprika to the filling for depth. This version keeps the hearty texture while making it plant-based—perfect for vegetarians who still crave that satisfying bite.
Seafood Arancini
For a coastal twist, mix ½ cup cooked shrimp and ½ cup crab meat into the risotto after it cools. Use white wine instead of milk (¼ cup) for the risotto to complement the seafood.
Garnish with lemon zest and serve with a side of garlic aioli for dipping. This variation is inspired by Sicilian coastal towns where seafood is a staple in street food.
Sweet & Savory Variation
Add a touch of sweetness by folding in ¼ cup dried cranberries and 2 tbsp chopped walnuts with the cheese. A pinch of cinnamon** (½ tsp) enhances the sweetness without overpowering the savory flavors.
This variation works surprisingly well and adds a festive touch—ideal for holiday gatherings or as a unique appetizer. 🍯
Nutrition facts
Frequently asked questions
Can I make beef arancini ahead of time?
Yes! Shape the arancini and refrigerate them for up to 24 hours before breading and frying. For longer storage, freeze the shaped (unbreaded) arancini on a tray, then transfer to a bag for 3 months. Thaw in the fridge overnight before breading and frying. The breading should be applied fresh for the best crunch.
Why are my arancini falling apart when frying?
This usually happens if the filling is too warm or the rice isn't cooked properly. Let the risotto cool completely before mixing in cheese and shaping. Also, ensure your rice is al dente—it should hold its shape when pressed but still have a slight bite. Chill the shaped arancini for 30 minutes before breading to help them hold together.
What's the best way to reheat leftover beef arancini?
For the crispiest results, reheat in a 375°F oven for 5-7 minutes on a wire rack. Avoid microwaving as it makes them soggy. If you must use the microwave, cover with a damp paper towel for 10-15 seconds to restore some crispiness. For extra crunch, broil for 1-2 minutes at the end.
Can I use regular breadcrumbs instead of panko?
You can, but panko creates that signature light, crispy texture. If using regular breadcrumbs, pulse them in a food processor for 10-15 seconds to make them finer. For extra crunch, mix half panko and half fine breadcrumbs in your second breading layer. The key is ensuring your breadcrumbs are dry and well-coated for maximum crispiness.
How do I make these arancini less greasy?
Keep your oil at a consistent 350°F and fry in small batches (4-5 at a time). Use a deep fry thermometer to monitor the temperature. Drain fried arancini on a wire rack instead of paper towels to remove excess oil. Also, make sure your filling is cool before shaping—warm filling can cause the breading to steam and become soggy.