
Soups & Stews
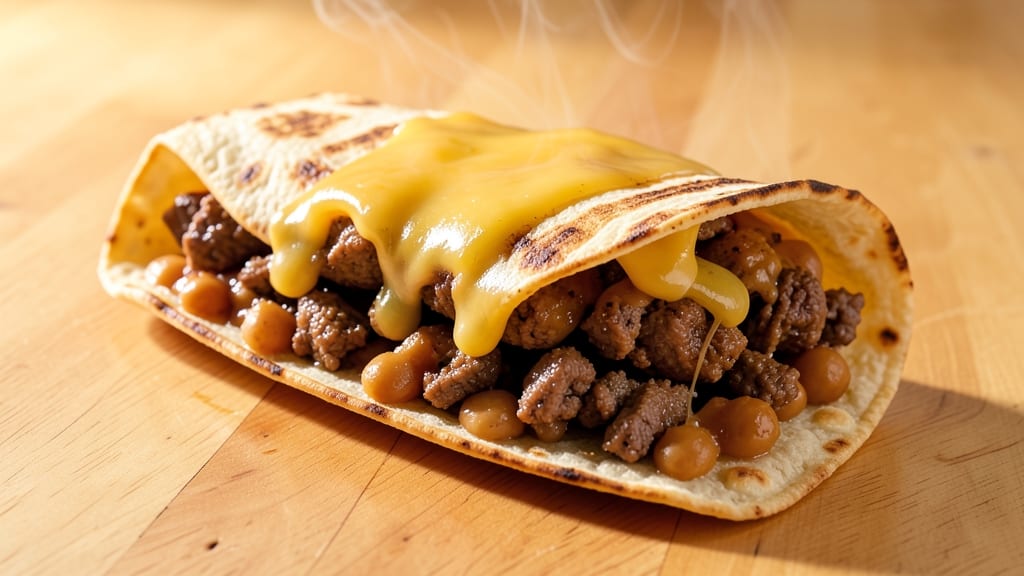
This beef and refried bean burrito recipe delivers the perfect balance of crispy tortilla edges and molten cheese rivers that pull apart with every bite. 💛 The secret lies in slow-cooked beef with deep cumin and chili flavors, creamy refried beans, and a tortilla that achieves that coveted restaurant-style crunch without deep-frying.
I developed this version after years of testing—each component must be perfectly timed to avoid soggy fillings or rubbery shells.
The process begins with browning ground beef in a cast-iron skillet, where the Maillard reaction builds rich, caramelized flavors. Meanwhile, the refried beans simmer until thick and velvety, absorbing all the spices from the beef drippings.
The tortillas get their signature crispiness from a quick air-fryer finish, while the cheese melts into golden rivers that cascade when you cut into the burrito.
What you'll end up with is a burrito that's sturdy enough to hold all the fillings without breaking, yet tender enough to fold neatly in half. The beef stays juicy and flavorful, the beans add creamy texture, and the cheese creates that irresistible pull-apart quality.
This is the kind of burrito that disappears in minutes—perfect for a hearty weeknight dinner or a satisfying lunch.
Serve with classic toppings like diced tomatoes, fresh cilantro, and a dollop of sour cream, or keep it simple with just salsa and avocado. The recipe scales easily, so you can make a batch for meal prep or feed a crowd.
Let's get started on making burritos that taste like they came from your favorite taqueria.
Ingredients for beef and refried bean burrito
Fourteen ingredients for burritos that taste like your favorite taqueria—crispy, cheesy, and full of flavor.
| Ingredient | Amount | Notes |
|---|---|---|
| Ground Beef (80/20) 🥩 | 1 ½ lb | Lean but flavorful, not pre-seasoned |
| Large Flour Tortillas 🌯 | 4 whole | 10-inch size, for crispiness |
| Refried Beans (Canned) 🥫 | 1 ½ cups | High-quality, not chunky |
| Shredded Monterey Jack Cheese 🧀 | 2 cups | Freshly shredded, not pre-shredded |
| Cumin Ground 🌿 | 1 tbsp | Toasted for deeper flavor |
| Chili Powder 🌶️ | 1 ½ tbsp | Medium heat, not smoked |
| Garlic Powder 🧄 | 1 tsp | Not garlic salt |
| Onion Powder 🧅 | 1 tsp | For sweetness |
| Salt 🧂 | 1 tsp | Kosher or sea salt |
| Black Pepper 🌶️ | ½ tsp | Freshly ground preferred |
| Vegetable Oil 🫒 | 2 tbsp | For browning beef |
| Sour Cream 🥛 | ¼ cup | For serving, full-fat |
| Fresh Cilantro 🌿 | ¼ cup | Chopped, for garnish |
| Diced Tomatoes 🍅 | ½ cup | For serving, canned or fresh |
The beef is where the magic starts. Ground chuck (80/20) gives you that perfect balance of flavor and juiciness—leaner cuts like 90/10 can dry out. Walmart or Costco usually have it pre-ground, but if you're buying whole chuck, trim off any fat caps. I always grab the Penzeys chili powder for that authentic kick, but the regular grocery store stuff works fine. Toast your spices in the dry pan for 30 seconds before adding the beef—this deepens the flavor. The refried beans? Look for canned beans with no added salt—like La Favorita or Bush's—so you control the seasoning.
No cumin? Ground coriander at half the amount works in a pinch, but it's not the same. Pre-shredded cheese is a no-go here—it gets gummy. Shred your own Monterey Jack (or a mix with cheddar) right before assembling. Running short on time? Microwave the beans for 30 seconds to soften them before mixing with spices. The tortillas are key—Mission or La Tortilla Factory make the best for crispiness. If you can't find them, heat your tortillas for 20 seconds in the air fryer before filling to prevent sogginess. And yes, you can make these ahead—just assemble and freeze, then air-fry from frozen for 5 minutes.
Assembled burritos keep for 3 days in the fridge, but they're best fresh. Air-fryer is your friend—crisp up tortillas for 2 minutes at 375°F after assembling. For meal prep, portion cheese separately and add it right before eating. The sour cream and cilantro stay fresh for 5 days in the fridge if stored in airtight containers. Double the batch—these disappear fast, and leftovers reheat beautifully in the oven at 350°F for 10 minutes.
Why You'll Love This Recipe
- Fewer Ingredients, Same Magic: I swear by this recipe because it actually uses what’s already in your pantry. One can of beans, a bag of cheese, and that 80/20 ground beef? That’s it. No chopping, no blending, no stress—just brown the meat, warm the tortillas, and fold. (Yes, even on a Tuesday night when you’ve got better things to do.)
- Cumin-Kissed Crunch: Here’s what sold me—the cumin in that beef. It’s not just seasoning; it’s the secret weapon. Toast the spices in the pan first, and you’ll get this deep, earthy aroma that sticks to every bite. Pair it with the creamy refried beans and melty Monterey Jack, and suddenly, you’ve got layers of flavor without trying too hard.
- Lunchbox or Dinner Plate: Between us, this recipe works everywhere. Pack them for work—no reheating needed—and they’ll still taste fresh. Or serve them at a party with a side of sour cream and salsa, and no one will guess they took 15 minutes to make. (My daughter picks out the cheese, but still asks for seconds.)
- Budget-Friendly Leftovers: I make a double batch on Sundays because it’s cheaper than takeout and feeds the family for days. The tortillas stay soft when reheated, the cheese doesn’t get rubbery, and the beef? It’s so flavorful, you won’t even miss the fancy ingredients. Plus, it’s one of those meals that tastes better the next day—honestly, a rare win.
Step-by-step instructions for crispy beef and refried bean burritos
Here's how to assemble burritos with perfectly crispy tortillas and gooey cheese rivers every time.
🔥 Step 1: Brown the Seasoned Ground Beef
Heat the 2 tablespoons vegetable oil in a large skillet over medium-high heat. Add the 1.5 lb ground beef (80/20) and break it apart with a wooden spoon. Let it cook undisturbed for 2-3 minutes until it starts forming small browned pieces.
Now add the 1 tablespoon cumin, 1.5 tablespoons chili powder, 1 teaspoon garlic powder, 1 teaspoon onion powder, 1 teaspoon salt, and 0.5 teaspoon black pepper. Stir well to coat the beef evenly, then cook for another 5-6 minutes until fully browned. The beef should be crumbly with no pink remaining—this ensures maximum flavor and food safety.
Drain excess fat if needed (about 1-2 tablespoons should remain for moisture), then remove the skillet from heat. Stir in the 1.5 cups refried beans and mix until fully combined. The beans will help bind everything together beautifully.
👨🍳 Step 2: Warm the Tortillas and Prepare the Filling
While the beef mixture cools slightly, warm the 4 large flour tortillas in one of these ways: wrap them in a damp paper towel and microwave for 20 seconds, or warm them dry in a 350°F oven for 1-2 minutes. The tortillas should be pliable but not brittle—this makes rolling much easier.
Spread about ¼ cup of the beef-bean mixture onto each tortilla, leaving a 1-inch border at the top. Sprinkle ½ cup shredded Monterey Jack cheese evenly over the filling, then fold the bottom edge of the tortilla up about 1 inch to create a base for rolling. This prevents filling from spilling out as you roll.
🥘 Step 3: Roll and Press for Maximum Crispiness
Starting from the folded bottom edge, tightly roll each burrito into a cylinder, pressing gently but firmly as you go. The goal is to create a compact burrito that will hold its shape when you fry it. I like to press down with my fingers while rolling to ensure everything stays contained—this is where the crispy texture starts.
Place the rolled burritos seam-side down on a plate and cover with a clean kitchen towel. Let them rest for 5 minutes while you preheat 2 tablespoons vegetable oil in a large skillet over medium heat. The resting time helps the filling set slightly so it doesn't ooze out during frying.
🔥 Step 4: Fry Until Golden and Crispy
Carefully add 2 burritos at a time to the hot oil and fry for 2-3 minutes per side until they develop a deep golden brown color. You want the tortillas to be crispy but not burnt—turn them gently with tongs to ensure even browning. The cheese should be melting inside, creating those gooey rivers you crave.
Transfer the fried burritos to a paper towel-lined plate to drain excess oil. Repeat with the remaining burritos, keeping the oil temperature consistent. If needed, add a little more oil between batches to maintain the medium heat level.
🍽️ Step 5: Serve with Toppings and Enjoy
Let the burritos rest for 2 minutes before serving to allow the cheese to set slightly. Plate each burrito and top with 2 tablespoons sour cream and 1 tablespoon fresh cilantro. Add 2 tablespoons diced tomatoes on the side for freshness.
Here's the secret to the perfect bite: cut into a burrito and you'll see the crispy tortilla exterior, melted cheese rivers, and perfectly seasoned beef-bean filling all working together. Serve immediately while everything is warm and crispy—these burritos are best enjoyed right away!
Pro Tips For Making Beef And Refried Bean Burrito
- CRANK THE HEAT: Start your ground beef on medium-high, not medium—you want that fat sizzling fast to render out before the cumin gets added. I learned this the hard way after my first batch turned into a greasy, underseasoned sludge because I played it safe with the heat.
- TOAST THOSE TORTILLAS: Warm your flour tortillas in a dry skillet for 10 seconds per side—just until they’re pliable and slightly crisp at the edges. Cold tortillas tear when you wrap, and no one wants a sad, limp burrito. (Yes, even if you're impatient like me.)
- SALT THE BEANS: Dump those canned refried beans into a bowl and give them a good stir with a pinch of salt and a splash of water (about 1 tablespoon). Canned beans taste flat, and this step makes them taste homemade without extra effort.
- STOP PACKING THEM TIGHT: Fill your tortillas no more than two-thirds full—overstuffed burritos burst when you wrap, and no one enjoys cleaning up cheese explosions. Leave room to fold without resistance. (Your future self will thank you.)
Storing and reheating this recipe
Refrigerator Storage
Assembled burritos keep beautifully in the fridge for up to 3 days if stored properly. Wrap each burrito tightly in plastic wrap or place them in airtight containers with parchment paper between layers to prevent sticking.
The tortillas will lose some crispiness but remain tender. I always store the cheese separately in a small container and add it fresh before reheating—this keeps the filling from getting soggy. 🥫
Freezer Prep
For longer storage, freeze burritos for up to 3 months in quart-sized freezer bags with all air removed. I like to wrap them individually in foil first, then place in bags to prevent freezer burn.
When ready to eat, thaw overnight in the fridge or reheat directly from frozen using the air fryer method below. The cheese will melt perfectly during reheating. ❄️
Air Fryer Reheating
My favorite method for crispy results! Preheat your air fryer to 375°F and place frozen or refrigerated burritos in the basket. Cook for 5-6 minutes, flipping halfway, until the tortillas are golden and crispy.
For burritos stored in the fridge, reduce time to 3-4 minutes. This method restores that perfect restaurant-style crunch without deep-frying. 🔥
Oven Method
For a hands-off approach, preheat oven to 350°F and place burritos on a baking sheet lined with foil. Cover loosely with foil and bake for 15 minutes. Remove foil and bake 5 more minutes until cheese is bubbly and tortillas are crispy.
This works well for batch reheating but won't be as crispy as air frying. 🍽️
Microwave Fix
When in a hurry, use the microwave for quick reheating. Place burrito on a microwave-safe plate, cover with a damp paper towel, and heat on 70% power for 1-2 minutes. Add 10 seconds at a time until heated through.
The tortilla won't be crispy but the filling will be hot and delicious. I recommend adding extra cheese after reheating for that gooey factor. ⏰
Cheese Melting Tip
For extra gooey cheese, sprinkle 1 tablespoon shredded cheese** on top of each burrito before reheating. The direct heat creates perfect rivers of melted goodness.
I also like to add a splash of water to the air fryer basket before cooking to create steam—this keeps the filling moist while crisping the tortilla. 🧀
Nutrition facts
Frequently asked questions
Can I use ground turkey instead of beef for these burritos?
Ground turkey works beautifully, especially if you want a leaner option. Use the same seasoning blend and cook it until it reaches 165°F (about 5-6 minutes after browning). The texture will be slightly different but still delicious. Just be mindful that turkey can dry out faster, so don't overcook it.
How do I make these burritos without frying?
For a lighter version, skip the frying step and bake instead. Place assembled burritos on a parchment-lined baking sheet and brush with a little oil. Bake at 400°F for 15-18 minutes, flipping halfway, until the tortillas are golden and crispy. The cheese will melt perfectly without deep-frying.
Why did my burritos fall apart when I tried to roll them?
This usually happens when the filling is too wet or the tortillas aren't warm enough. Let the beef-bean mixture cool slightly before assembling, and make sure your tortillas are pliable but not brittle. Also, fold the bottom edge up first to create a base—this helps contain the filling as you roll.
Can I make these burritos ahead of time?
Yes! Assemble the burritos and wrap them tightly in plastic wrap or foil. Store them in the fridge for up to 3 days or freeze for 3 months. To reheat, use the air fryer method (5-6 minutes at 375°F) for the best crispiness. Add cheese fresh after reheating for that gooey texture.
What's the best way to make the tortillas extra crispy?
For maximum crunch, warm the tortillas in the air fryer for 30 seconds at 375°F before filling them. After assembling, give them a quick air-fryer finish (2 minutes at 375°F**) or pan-fry them in a little oil until golden brown. The key is high heat and minimal oil—this creates that perfect crispy shell without sogginess.