
Soups & Stews
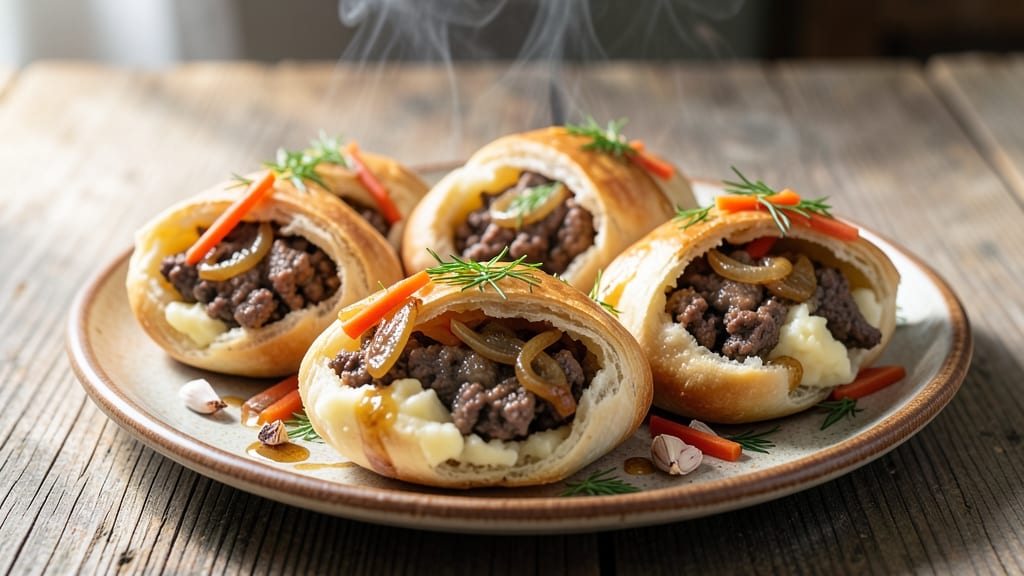
This beef and potato piroshki recipe delivers flaky, golden layers of dough wrapped around a hearty, savory filling that tastes like a cozy Eastern European feast. 💛 The secret lies in the dough's tender yet crispy texture—achieved through precise layering and a touch of patience—and the filling's perfect balance of tender beef, creamy potatoes, and aromatic spices that make every bite irresistible.
What sets these piroshki apart is the foolproof technique for sealing the dough without leaks, ensuring your pastries stay intact while baking or frying. The filling cooks down just enough to hold its shape, so each bite delivers that satisfying mix of juicy beef, buttery potatoes, and herby seasoning.
No shortcuts here—just the kind of homemade comfort food that feels like a hug in every forkful.
Once you master this recipe, you'll have a dish that's perfect for family dinners, potlucks, or even a special weekend treat. The piroshki can be baked for a lighter texture or fried for extra crispiness, and they reheat beautifully for leftovers.
Pair them with a dollop of sour cream or a simple cucumber salad to round out the meal.
Ready to impress? The dough requires a little time to rest, but the result is worth every minute—restaurant-quality pastries you can make at home. Let's get started with the filling, where the magic begins.
Ingredients for beef and potato piroshki
Twelve ingredients for restaurant-quality piroshki that'll make your kitchen smell like home.
| Ingredient | Amount | Notes |
|---|---|---|
| Ground Beef 🥩 | 1 ½ lb | 80% lean, finely ground |
| Russet Potatoes 🥔 | 3 large | Peeled, cubed (about 2.5 cups) |
| Yellow Onion 🧅 | 1 large | Diced (about 1.5 cups) |
| Carrots 🥕 | 2 medium | Peeled, finely diced |
| Garlic Cloves 🧄 | 4 cloves | Minced for filling |
| All-Purpose Flour 🌾 | 4 cups | Plus 1 tbsp for dusting |
| Unsalted Butter 🧈 | ½ cup | Cold, cubed (for dough) |
| Active Dry Yeast 🍞 | 1 tbsp | Or 2.25 g |
| Granulated Sugar 🍚 | 1 tbsp | For yeast activation |
| Salt 🧂 | 1 ½ tsp | Kosher or sea salt |
| Ground Black Pepper 🌶️ | 1 tsp | Freshly cracked |
| Dried Thyme 🌿 | 1 tsp | Or 1 tbsp fresh |
| Vegetable Oil 🫒 | ½ cup | For frying (or baking) |
| Sour Cream 🥛 | ½ cup | For serving (optional) |
The beef and potatoes are the heart of these piroshki, so don't skimp. For the potatoes, Russets are ideal—they're starchy enough to hold their shape but creamy when cooked. Trader Joe's and Whole Foods usually carry them pre-washed, but if you grab them from the regular grocery store, scrub them well first. The beef? 80% lean ground chuck gives you that perfect balance of flavor and tenderness. I always grab mine from the butcher counter—it's fresher than the pre-packaged stuff. For the onions, yellow onions add the most sweetness when caramelized, but red onions work too if you're in a rush.
No sour cream for serving? Greek yogurt or vegan sour cream works just as well. Skipping the thyme? Dried oregano at half the amount gives a similar earthy note. The yeast is non-negotiable here—it's what makes the dough light and fluffy. If your kitchen's cold, warm the water slightly to help it activate. For the dough, I swear by King Arthur flour—it's got that perfect protein-to-gluten ratio for tender layers. But any all-purpose flour works in a pinch. The key is letting the dough rest at least 2 hours, so plan ahead.
The dough keeps beautifully in the fridge for 3 days wrapped in plastic, or you can freeze it for up to 3 months by rolling it into a log and wrapping tightly. The filling can be prepped ahead too—just store it in an airtight container in the fridge for 2 days. When you're ready to cook, let everything come to room temp first. Piroshki reheat best in a 350°F oven for 10-15 minutes—they crisp up perfectly without getting soggy. Leftovers? Freeze them for 1 month—just thaw and reheat.
Why You'll Love This Recipe
- One-Pan Magic: I swear by this recipe for lazy nights—just brown the beef, toss in diced potatoes and onions, and let it all simmer. No chopping boards to clean, no extra pots, just one pan that smells like home by the time you’re done.
- Savory Crispy Edge: That golden crust on the potatoes? It’s the secret weapon. I roast them first until they’re caramelized, then finish them off in the beef mixture—creamy inside, crispy outside, with just enough garlic to make it sing.
- Packed Lunch Hero: Between us, this is my go-to for meal prep. The filling stays fresh for days, and I can freeze half the batch for those "I don’t want to cook" mornings. Reheat it, stuff it into a tortilla or eat it straight—no judgment here.
- Budget-Friendly Feast: Ground beef and potatoes stretch for miles, and carrots add sweetness without breaking the bank. I’ll be real: this recipe feeds four for under $10, and the leftovers? Even better the next day when the flavors meld.
Step-by-step instructions for beef and potato piroshki
Here's how to make these golden, flaky pastries with a savory beef filling that'll have everyone asking for seconds.
👨🍳 Step 1: Make the Filling (The Heart of Your Piroshki)
In a large skillet, heat 0.25 cup of the vegetable oil over medium heat. Add the 1 large diced yellow onion and cook for 5 minutes until soft and translucent. Add the 2 medium finely diced carrots and cook for another 3 minutes until they begin to soften.
Push the vegetables to one side of the pan and add the 1.5 lb ground beef. Cook until browned, breaking it up with a wooden spoon. Drain any excess fat if needed. Stir in the 4 minced garlic cloves, 1.5 tsp salt, 1 tsp ground black pepper, and 1 tsp dried thyme. Cook for 2 more minutes until fragrant.
Add the 3 large cubed russet potatoes and stir to combine. Reduce heat to low and simmer for 15-20 minutes until the potatoes are completely tender and the mixture has thickened. Remove from heat and let cool completely before using.
🍳 Step 2: Prepare the Yeast Dough (The Flaky Secret)
In a small bowl, combine 1 cup warm water (110°F), the 1 tbsp active dry yeast, and 1 tbsp granulated sugar. Let sit for 5-10 minutes until foamy. In a large bowl, mix the 4 cups all-purpose flour and 1.5 tsp salt.
Make a well in the center and pour in the yeast mixture along with the 0.5 cup cold cubed unsalted butter. Using a wooden spoon, stir until a shaggy dough forms. Turn onto a lightly floured surface and knead for 8-10 minutes until smooth and elastic. The dough should be slightly tacky but not sticky.
Place the dough in a lightly oiled bowl, cover with a damp towel, and let rise in a warm place for 1-1.5 hours, or until doubled in size. Here's the thing—your kitchen should feel warm enough that you can see a light sheen of condensation on the bowl.
🥘 Step 3: Assemble and Shape the Piroshki (Where Magic Happens)
Once the dough has risen, punch it down and divide it into 12 equal pieces (about 2 oz each). Roll each piece into a ball and flatten slightly. Keep the remaining dough covered while you work.
Take one dough ball and roll it out on a floured surface into a 6-inch circle. Place 2-3 tbsp of the filling in the center. Fold the dough over the filling, sealing the edges firmly by pinching with your fingers. Roll the sealed edge gently to create a smooth, round piroshki. Repeat with remaining dough and filling.
Place the shaped piroshki on a parchment-lined baking sheet, cover with a towel, and let rise for 30 minutes. You'll know they're ready when they've puffed up slightly and look plump. Preheat your oven to 375°F while they rise.
🔥 Step 4: Fry or Bake to Golden Perfection (Choose Your Method)
For frying: Heat 0.25 cup vegetable oil in a deep skillet over medium heat until shimmering. Fry the piroshki in batches for 3-4 minutes per side until golden brown and crispy. Drain on paper towels.
For baking: Brush the piroshki with a little beaten egg and bake for 20-25 minutes until golden brown. The baking method gives you slightly less crispiness but is a healthier alternative.
Serve warm with the optional 0.5 cup sour cream on the side. The secret to flaky piroshki? Don't skip the cooling step between shaping and frying—it gives the dough time to relax and creates those beautiful layers.
Pro Tips For Making Beef And Potato Piroshki
- Boil Potatoes Until Fork-Tender: Russets stay dry and mealy if you overcook them, but stop at just fork-tender—they’ll finish cooking in the filling. Test with a knife: it should slide in like butter, not pull back like a stubborn child. (Yes, even if you’re impatient like me.)
- Brown the Beef First: That raw-beef taste? It’s the enemy. Break the meat into small chunks, sear them in batches until deeply browned, then drain the fat. The crust locks in flavor and keeps the filling from turning greasy later—trust me, your piroshki will taste like a proper pub, not a sad school lunch.
- Grated, Not Chopped Carrots: I used to chop carrots, and they’d sit like rocks in the filling. Grate them fine—almost like coleslaw texture—and they melt into the beef instead of making you chew like a cow. (Bonus: your filling will look richer and more cohesive.)
- Prevent Overstuffed Dough: The golden rule: no more than 1/3 cup filling per piroshki—any more and the dough tears when sealing. Weigh it out if you’re skeptical, but even eyeballing works if you’re consistent. (I learned this after gluing a piroshki back together with egg wash—don’t ask.)
Pro cooking tips for great beef and potato piroshki
Dough Layering Secrets
For that signature flaky texture, work quickly but gently when handling the dough. After rolling each circle, let it rest for 2 minutes before adding filling—this prevents shrinking. I use a rolling pin with a marble base (like the OXO Good Grips model) to keep even pressure.
Press down firmly in the center first, then roll outward to create a thin, even circle—about 1/8-inch thick. 💛
Filling Consistency
The filling should be thick enough to hold its shape when packed into the dough but still moist enough to stay juicy. If your filling feels too wet after cooking, simmer it uncovered for 5 extra minutes to evaporate excess moisture.
For extra flavor, I sometimes add 1 tbsp tomato paste to the beef mixture while browning—it deepens the savory notes without making the filling too saucy.
Sealing Like a Pro
Moisten your fingers with water and pinch the edges of the dough firmly to create a tight seal. I use a small offset spatula to help press the edges together if they're tricky.
The key is to keep the dough taut while sealing—this prevents leaks during cooking. For extra security, I brush the sealed edges with a little beaten egg white before the final rise.
Frying Temperature
Use a deep-fry thermometer to maintain oil at 350°F—this gives you that perfect golden crust without burning. If your oil isn't hot enough, the piroshki will absorb too much oil and become greasy.
I like using avocado oil for frying because of its high smoke point and neutral flavor. Fry in batches of 2-3 piroshki at a time to avoid overcrowding the pan.
Baking Shortcuts
For baked piroshki, brush the tops with egg wash (1 egg + 1 tbsp water) and sprinkle with coarse salt before baking. This creates a beautiful golden crust.
If you're short on time, you can skip the second rise after shaping—just bake immediately at 400°F for 15-18 minutes, though they won't puff up as dramatically. For extra crispiness, broil for 1-2 minutes at the end.
Make-Ahead Dough
Divide the risen dough into balls, wrap tightly in plastic, and refrigerate for up to 24 hours. When ready to use, let them sit at room temperature for 30 minutes before shaping. For frozen dough, shape the piroshki, place them on a tray, and freeze until solid.
Then transfer to a freezer bag—thaw overnight in the fridge before cooking. This is my go-to method for busy weekends! ⏰
Nutrition facts
Frequently asked questions
Can I make the piroshki dough ahead of time?
Divide the risen dough into 12 balls, wrap tightly in plastic, and refrigerate for up to 24 hours. For freezing, shape the piroshki, place them on a tray, and freeze until solid before transferring to a bag. Thaw overnight in the fridge before cooking. This is perfect for meal prep!
What if my piroshki filling leaks during cooking?
Leaks usually happen from improper sealing. Moisten your fingers with water and pinch the edges firmly, keeping the dough taut. For extra security, brush sealed edges with beaten egg white before the final rise. Also, ensure your filling isn't too wet—simmer it 5 extra minutes if needed.
Can I bake instead of fry these piroshki?
Yes! Brush the tops with egg wash (1 egg + 1 tbsp water) and bake at 375°F for 20-25 minutes until golden. For extra crispiness, broil for 1-2 minutes at the end. Baked piroshki are lighter but still delicious—just skip the oil!
How do I keep the dough from shrinking when rolling?
Let each rolled circle rest for 2 minutes before adding filling. Use a rolling pin with even pressure (like OXO Good Grips) and keep the dough 1/8-inch thick. Work quickly but gently to maintain tension. A warm kitchen helps too—aim for 75°F for optimal dough handling.
What's the best way to reheat leftover piroshki?
For crispy results, reheat in a 350°F oven for 10-15 minutes on a parchment-lined tray. For fried piroshki, you can also warm them in a skillet over medium heat for 2-3 minutes per side. Avoid microwaving—they lose their texture. Leftovers keep for 3 days in the fridge or 1 month frozen.