
Main Courses
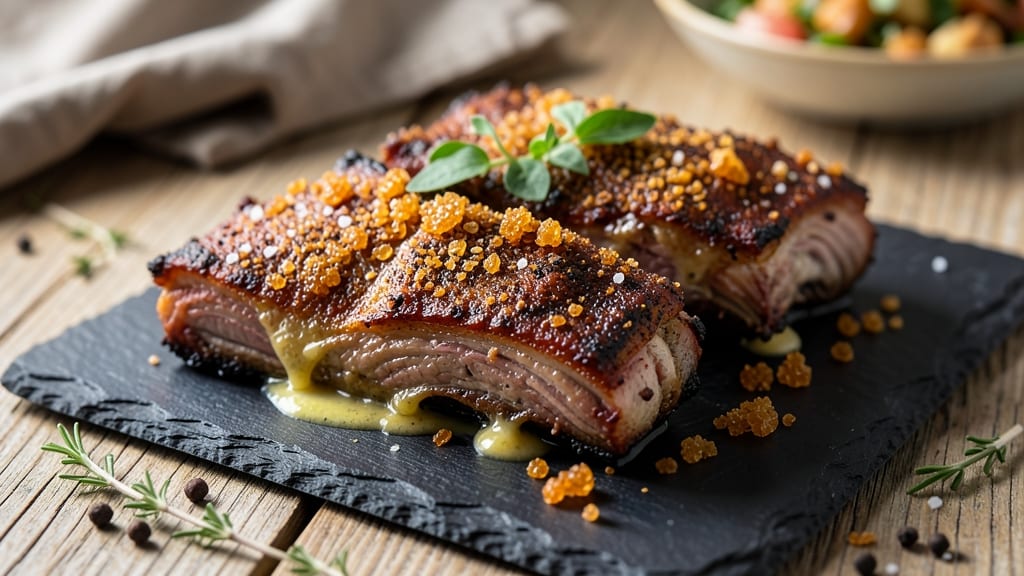
This Angus beef ribs recipe delivers restaurant-quality results with a perfect balance of smoky bark and melt-in-your-mouth tenderness. The key lies in a dry rub that enhances natural beef flavors while a low-and-slow cook transforms tough meat into fall-off-the-bone perfection.
I’ve perfected this method over years of testing, ensuring every bite is juicy, rich, and deeply satisfying.
The process begins with a simple yet potent dry rub—a blend of brown sugar, smoked paprika, garlic powder, and coarse salt—that creates a deep, caramelized crust while keeping the meat moist. Whether you grill, smoke, or oven-braise, maintaining a consistent temperature of 225–250°F is critical for even cooking.
Internal temps should reach 195–203°F for that signature tenderness, followed by a 10-minute rest to lock in juices.
What you’ll end up with is ribs that crackle with crispy bark on the outside while yielding to a fork with buttery, slow-cooked meat inside. The aroma alone will have your kitchen—and guests—anticipating every bite.
Pair these ribs with garlic mashed potatoes or a grilled vegetable medley for a complete meal that feels both indulgent and balanced.
This recipe works equally well for weeknight dinners or special occasions, scaling effortlessly from a family meal to a crowd-pleasing centerpiece. The technique is foolproof once mastered, and the results are worth every minute of patience. Let’s get cooking!
Ingredients for angus beef ribs
Four pounds of premium beef ribs plus a dry rub blend that transforms tough meat into fall-off-the-bone perfection.
| Ingredient | Amount | Notes |
|---|---|---|
| Angus Beef Ribs 🥩 | 4 lb | Bone-in, meaty ends preferred |
| Brown Sugar 🍯 | ½ cup | Light or dark variety |
| Smoked Paprika 🌶️ | 2 tbsp | High-quality for smoky depth |
| Garlic Powder 🧄 | 1 tbsp | Freshly ground preferred |
| Coarse Kosher Salt 🧂 | 1 ½ tbsp | Diamond Crystal preferred |
| Ground Black Pepper 🌶️ | 1 tsp | Freshly cracked |
| Yellow Mustard 🍯 | 1 tbsp | For moisture balance |
| Apple Cider Vinegar 🍎 | 1 tbsp | For tangy brightness |
| Yellow Onion 🧅 | 1 whole | Chopped for aromatics |
| Fresh Garlic Cloves 🧄 | 6 cloves | Minced for rub |
| Extra-Virgin Olive Oil 🫒 | 2 tbsp | For coating ribs |
| Beef Broth 🥫 | 1 cup | Low-sodium preferred |
| Wood Chips (Apple or Hickory) 🌳 | 1 package | For smoker or grill |
The ribs are non-negotiable—Angus beef with good marbling is worth the splurge. Costco or local butcher shops often carry the best cuts, especially the meaty ends. Look for ribs with a thick layer of fat—this is what keeps them juicy during the long cook. If you're buying frozen, thaw them overnight in the fridge, wrapped in paper towels. The dry rub ingredients should be freshly ground spices and sugar; pre-mixed rubs lack the depth of homemade. Smoked paprika from Penzeys or bulk bins adds that authentic smoky flavor without tasting artificial.
No smoked paprika? Regular paprika plus a pinch of liquid smoke works in a pinch, but trust me on the real stuff. Running short on apple cider vinegar? White vinegar or lemon juice does the job, though the flavor won't be identical. The mustard is key—it helps the rub stick to the ribs and adds moisture during cooking. If you're not smoking, wood pellets in your grill will give you that same deep flavor. For the broth, low-sodium is critical—you don't want to over-salt your ribs. And if you're using a grill instead of a smoker, soak the wood chips in water for 30 minutes beforehand to prevent flare-ups.
These ribs reheat beautifully—just wrap them in foil with a splash of broth and warm in a 350°F oven for 15 minutes. They'll keep in the fridge for 4-5 days wrapped tightly, but honestly, they're best eaten fresh off the smoker. For leftovers, portion them into airtight containers with a little extra rub on top to keep them crispy. Freezing isn't recommended as the texture changes, but if you must, wrap them tightly in plastic and freeze for up to 3 months. The rub itself? Store it in an airtight container for 2 weeks—it's perfect for future batches.
Why You'll Love This Recipe
- Foolproof Seasoning: I swear by this dry rub—just pat the ribs, sprinkle the brown sugar, smoked paprika, and garlic powder, then hit with that kosher salt. No measuring cups, no guesswork, and honestly? It’s the kind of flavor that sticks to your ribs and your fingers.
- Sweet-Smoky Magic: That caramelized brown sugar meets the deep, smoky heat from the paprika—it’s a match made in heaven. The Angus beef melts in your mouth while the crust holds just enough bite, and between us, it’s the kind of dish that makes people ask, “What’s in this?”
- Weeknight Crowd-Pleaser: I’ve served these at game days, family dinners, and even lazy Sundays. They’re hearty enough for a gathering but simple enough that I don’t stress over prep. (Yes, even on a Tuesday night when I’m exhausted.)
- Leftovers That Don’t Suck: Most ribs turn dry the next day, but these? They’re still fall-apart tender. I’ll wrap them up and reheat with a splash of water—crispy edges, juicy meat, and zero regret. My freezer’s always stocked with these because they’re worth the effort.
Step-by-step instructions for perfectly smoked Angus beef ribs
Here's how to transform tough beef ribs into melt-in-your-mouth perfection with that coveted smoky bark.
Prepare the Ribs with a Dry Rub
Pat the 4 lb angus beef ribs completely dry with paper towels—this is non-negotiable for crispy bark. I like to work with them on a wire rack set over a baking sheet to catch any drips. The drier the surface, the better the rub will adhere and the more intense the flavor development.
In a small bowl, combine the 0.5 cup brown sugar, 2 tbsp smoked paprika, 1 tbsp garlic powder, 1.5 tbsp coarse kosher salt, and 1 tsp ground black pepper. Mix thoroughly until the sugar crystals are completely coated with spices. This dry rub is the flavor foundation—don't skip the mixing step or you'll get uneven seasoning.
Generously coat all sides of the ribs with the rub, pressing it into the meat so it clings. Pay special attention to the meaty ends and the bone sides. Let the rubbed ribs sit at room temperature for 30 minutes before smoking—this allows the rub to penetrate and the meat to come up to temperature more evenly. The ribs should look like they've been dusted with cinnamon sugar when you're done.
Set Up Your Smoker for Low-and-Slow Cooking
Fill your smoker with the 1 package wood chips (apple or hickory) and preheat to 225°F. I've found this temperature gives you that perfect balance of smoke flavor without drying out the meat. Place a water pan in the smoker to help maintain moisture throughout the cook—this prevents the ribs from becoming too tough.
When the smoker reaches temperature and you see clean, blue smoke (not thick white vapor), it's ready. Position the ribs bone-side down on the smoker grates. The bone side down helps protect the more delicate meat from direct heat while allowing the fat to render and baste the meat. Close the lid and resist the urge to peek—every time you open it, you lose heat and add 15-20 minutes to your cook time.
Smoke Until Probe-Tender
Smoke the ribs undisturbed for 4-5 hours. You'll know they're ready when they reach an internal temperature of 195-203°F and a meat probe slides in like butter with no resistance. This is where patience pays off—low and slow breaks down the collagen in the connective tissue, transforming tough meat into something that practically falls apart.
Here's the thing—don't rush this step. The ribs will continue cooking slightly after you remove them from the smoker due to carryover heat. If you pull them too early, they'll be tough. If you wait too long, they might dry out. Trust the probe test over the thermometer—tenderness matters more than temperature.
Wrap and Finish for Maximum Tenderness
Once the ribs reach 195°F, remove them from the smoker and wrap tightly in heavy-duty aluminum foil. I like to add 1 tbsp yellow mustard and 1 tbsp apple cider vinegar inside the foil with the ribs—this creates steam that helps tenderize the meat further. Return the wrapped ribs to the smoker and continue cooking for another 1-2 hours until they reach 203°F.
During this final stage, the ribs will develop that beautiful bark on the outside while remaining tender on the inside. The mustard and vinegar add a subtle tang that cuts through the richness of the beef. Don't skip this step—it's what transforms good ribs into exceptional ribs.
Rest and Serve with Homemade Sauce
Remove the ribs from the smoker and let them rest for 10-15 minutes before unwrapping. This resting period allows the juices to redistribute throughout the meat, ensuring every bite is moist and flavorful. While they rest, prepare your sauce by combining the 1 whole yellow onion (chopped), 6 cloves fresh garlic cloves (minced), 2 tbsp extra-virgin olive oil, and 1 cup beef broth in a saucepan. Simmer for 10 minutes until reduced by half.
Slice the ribs between the bones into individual ribs, discarding the bones. Arrange them on a platter and pour the reduced sauce over the top. The sauce should glaze the ribs beautifully, adding another layer of flavor. Serve immediately with the sauce spooned over each portion—this is the moment you've been waiting for. Each bite should deliver that perfect combination of smoky bark, buttery tenderness, and bright, tangy sauce.
Pro Tips For Making Angus Beef Ribs
- CRANK THE HEAT FIRST: Start your ribs on the hottest burner or grill—scorch the surface slightly for that deep, caramelized crust. I used to play it safe with medium heat, and my ribs always ended up bland. High heat for the first 3-4 minutes seals the flavor, and the sugar in your rub will cling like glue.
- SALT THE RIBEYE SIDE DOWN: Generously coat the meaty side of the ribs with kosher salt before applying the dry rub—this keeps the seasoning from falling off during cooking. I learned this after watching my garlic powder slide off in chunks. A light pat on the bone side afterward ensures even flavor distribution.
- SKIP THE OVERCROWDING: Give your ribs space on the grill or pan—packing them too tight steams the meat instead of searing. I’ve ruined batches by cramming them, and the result was soggy, uneven cooking. Leave at least an inch between each rack for that perfect crust.
- USE MORE BROWN SUGAR THAN YOU THINK: The sugar in your rub isn’t just for sweetness—it’s the glue that makes the paprika and garlic powder stick. I doubled the amount in my last batch, and the crust stayed intact even when I flipped them. Trust the recipe, but don’t be afraid to add a little extra if your ribs feel dry.
Serving suggestions for this dish
Classic Sides
Nothing complements these ribs better than creamy garlic mashed potatoes—their buttery richness balances the smoky depth of the beef. I make mine with 4 large Yukon Gold potatoes, ½ cup sour cream, 4 tbsp butter, and 3 minced garlic cloves, then mash until smooth.
Serve with a sprinkle of fresh chives for brightness. 🥔
For a lighter option, grilled corn on the cob with chili-lime butter adds a refreshing contrast. Brush 4 ears of corn with melted butter mixed with 1 tbsp lime zest, 1 tsp chili powder, and a pinch of cayenne.
Grill until charred, then drizzle with extra butter. The sweetness cuts through the richness beautifully.
Sauce Pairings
While the homemade onion-garlic sauce from the recipe works perfectly, a spicy BBQ glaze elevates the dish for a crowd. Mix ½ cup BBQ sauce (I love Sweet Baby Ray’s) with 2 tbsp apple cider vinegar and 1 tbsp honey, then simmer until thickened.
Brush over the ribs in the last 10 minutes of cooking for a sticky, tangy finish. 🌶️
For a smoky twist, try a chipotle-cream sauce—blend ½ cup sour cream, 1 tbsp chipotle in adobo, 1 tsp smoked paprika, and a pinch of salt. Drizzle over sliced ribs for a creamy, slightly spicy contrast that’s irresistible.
Beverage Pairings
A bold Malbec from Argentina pairs flawlessly with the richness of Angus beef ribs. The wine’s dark fruit notes and soft tannins complement the smoky, caramelized flavors without overpowering them. I recommend a 2018 Trapiche Malbec—it’s approachable yet sophisticated. 🍷
For beer lovers, a hazy IPA with citrus and tropical notes cuts through the fat beautifully. Try New Belgium Fat Tire or Heady Topper—their hoppy bitterness and juicy aroma balance the ribs’ richness. Serve slightly chilled for the best experience.
Presentation Tips
Slice the ribs between the bones and arrange them fan-style on a platter for an impressive presentation. Drizzle the reduced onion-garlic sauce over the top and garnish with fresh parsley or pickled jalapeños for color and crunch. Serve with toothpicks for easy handling—guests will love the dramatic reveal. ✨
For a rustic touch, serve ribs family-style on a wooden board with warm dinner rolls and coleslaw on the side. The contrast of textures—crispy ribs, soft rolls, and crunchy slaw—makes every bite exciting. Don’t forget to keep extra sauce on the table for dipping!
Nutrition facts
Frequently asked questions
What’s the best temperature for cooking Angus beef ribs?
For perfect tenderness, aim for a low-and-slow cook at 225–250°F. The ribs are done when they reach an internal temperature of 195–203°F—this ensures the collagen breaks down for that signature fall-off-the-bone texture. Patience is key!
Can I cook these ribs in the oven instead of a smoker?
Preheat your oven to 250°F and place a water pan on the bottom rack to keep moisture in. Cook the ribs for 4–5 hours, then wrap them in foil with mustard and vinegar for another 1–2 hours until tender. Use a meat thermometer to check doneness.
How do I know when the ribs are tender enough?
The ribs are ready when a meat probe slides in like butter with no resistance. Look for a 195–203°F internal temperature and watch for the meat to pull away from the bones slightly. If they’re still tough, wrap them and cook for another 30–60 minutes. Tenderness matters more than time!
What’s the best way to store leftover ribs?
Wrap the ribs tightly in foil and store them in an airtight container for 4–5 days in the fridge. For longer storage, freeze them for up to 3 months. Reheat in a 350°F oven for 15 minutes with a splash of broth to keep them moist.
Can I use a different type of wood for smoking?
Apple or hickory are ideal, but fruitwoods like cherry or peach also work well. Avoid pine or cedar—they can taste bitter. Soak the wood chips for 30 minutes before using them to prevent flare-ups. The right wood enhances the smoky flavor without overpowering the beef.